Performing manual validation
On the Interactive graphing page, the Reads table displays a list of the service point channels being graphed.
Use the following procedure to manually validate the plotted channels:
-
From the Actions menu (
 ) on the card, select Manually validate. The Manual validation dialog appears.
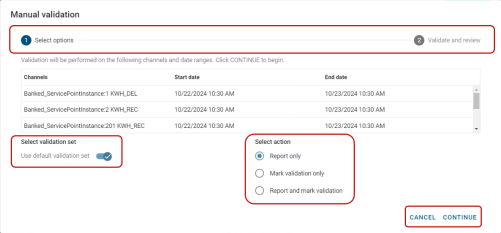
-
By default, the Use default validation set option is enabled and validation will be performed on the channels and date range listed in the table. To perform validation using a different validation set, toggle this option off and select the validation set from the dropdown menu.
-
Select an action:
-
Report only. Shows the details of the validation results but does not save the readings in the database. By default, this option is selected.
-
Mark validation only. Shows the status of the validation results and saves the readings in the database.
-
Report and mark validation. Shows the details of the validation results and saves the readings in the database.
-
-
Click Continue to view the validation report.
Validation statuses:
-
If the validation is successful, the Pass (
 ) validation status appears on the tab, and the validation completed message appears on the dialog.
-
If the validation is unsuccessful, the Error (
 ), Fail (
 ), Skip (
 ), or Warn (
 ) validation status appears on the tab, and an error message appears on the dialog.
-
When there are multiple errors, the validation status appears in the row on the table with the error message beneath it. Click Copy (
 ) next to the error message to copy the details of the errors to the clipboard for further investigation.
Note: The validation completed message appears when you select Mark validation only and Report and mark validation. It does not appear when you select Report only.
-
-
To download a pdf of the report, click Download (
 ) or click Close if you are finished. Upon closing, the Interactive graphing page refreshes to fetch new reads.